Detect weather effects, analyze and increase ROI
Do my customers buy more when it rains or when the sun shines? In which weather conditions are they more active in my online store, which products are particularly weather-dependent and which are not at all?
It’s clear that the weather has a big influence on what I’m interested in or what I buy. But until now, it was quite complicated to detect weather effects in Google Analytics and perform analyses. Why? Because weather data could not simply be matched with every user action and analyses were therefore only possible through subsequent matching.
This is now changing with the Weather Tag by METEONOMIQS. Simply integrate the tag via the Google Tag Manager and enrich the user interactions with the local weather conditions in the Google Analytics setup. This is a quick and standard way to visualize and quantify weather effects.
Here we show how to implement the tag and which advantages the Weather Tag has for analysts and marketers.
The benefits of weather analytics for analysts and marketers
Which items do customers ask for in bad or good weather?
Does my online store have a weather-dependent product range? Fashion, food, sports, furniture, cars, gardening – many products react strongly to the weather. But at what point are customers interested in fall or winter fashion? Which indoor or outdoor products are particularly weather-sensitive?
Why did the key figures plummet last week?
Hardly any customers in the online store and of course the boss immediately wants to know why that is. Were there technical problems, were ads not displayed correctly, and maybe the weather is to blame? That’s quite possible, after all it was over 30 degrees all last week and instead of online shopping, it was better to cool off at the lake.
What about hotel bookings on bad weather days?
A rainy autumn weekend is on the cards. Perfect weather not only for dreaming about a vacation on the couch at home, but also for clicking through the current offers.
How weather-dependent assortment and turnover are and whether the hypotheses are true that hotel bookings increase on bad weather days and that the store is empty because it is too warm, can be easily verified with the Weather Tag.
With the Weather Tag, you can explain performance drops and peaks based on precise weather data and use the insights for your marketing campaigns. To stay with the examples from above:
If it turns out that interest in vacations increases on rainy days, it’s best to run more ads exactly then.
The second case is similar. If customers prefer to be outdoors rather than online when the summer weather is really hot, it’s better to scale back activities to save money.
Weather Tag: Step-by-Step Guide
Step 1: Register on meteonomiqs.com
To use the Weather Tag, first register for an API access here.
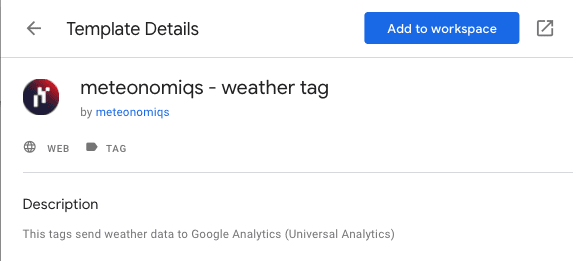
Step 2: Import the Weather Tag
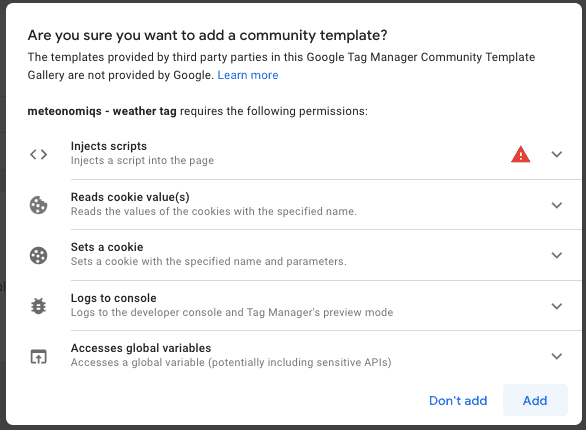
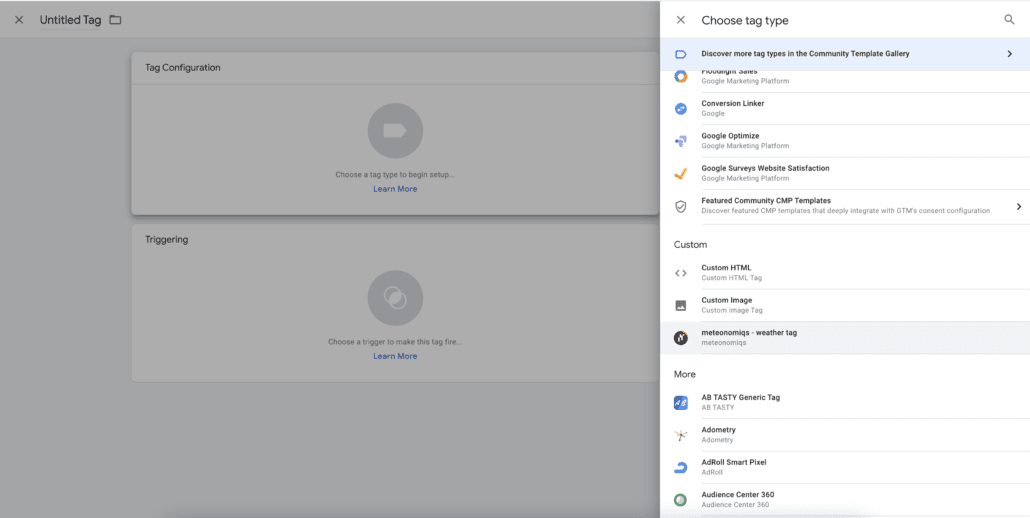
Open your Google Tag Manager account, click Templates and select the Weather Tag from the Community Template Gallery. Add the template to your workspace.
Click on add.
Please ensure, you are using the newest version of the template. Beginning at version 3 template, the version is shown directly in the Google Tag Manager-Tag:
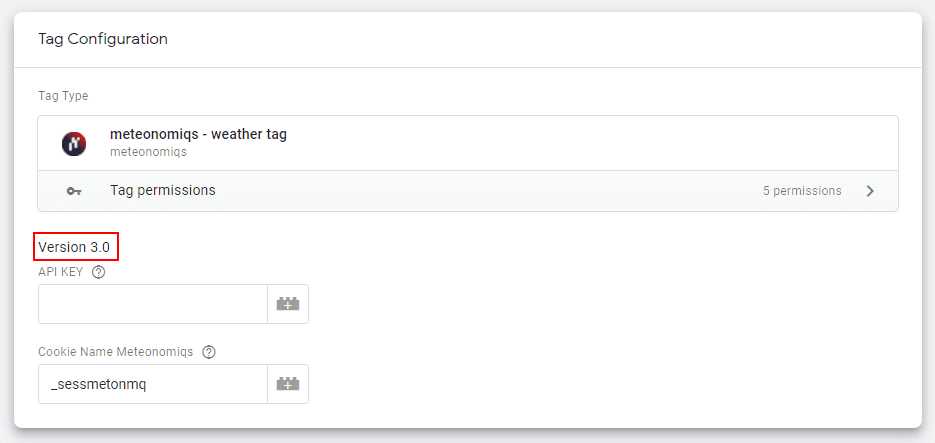
If you don’t see the version in the tag, please update your configuration to the newest tag version.
Step 3: Data Privacy Statement & CMP configuration
What you need your customers’ consent for when you use the Weather Tag:
- We store a cookie (
_sessmetonmq) with valuetruefor 30 minutes in order to send the request not more than once per 30 minutes to the meteonomiqs backend - The request that is sent to the meteonomiqs backend includes the Google client id from the Google Analytics cookie
_ga - From the request, the IP address is used to derive the location (latitude, longitude) for determining the weather at that location
- The Google client id together with the weather data is sent to Google analyics
- IP address and location are not stored for further processing, but can be logged for troubleshooting. Logs are kept up to 10 days
An easy way is to add wetter.com Gmbh (meteonomiqs is a brand of wetter.com GmbH) as non IAB Vendor to your CMP (TCF2.0).
- Description: The presumable location is determined based on your IP address. A weather query is then made with the location data. This weather data is transmitted to the website operator for analysis purposes. The IP address is stored in the logs to identify abuse for up to 10 days. No further processing takes place.
- Name of processing company: meteonomiqs.com / wetter.com GmbH
- Address of processing company: Reichenaustr. 19a, 78467 Konstanz
- Puposes: Weather analytics
- Data Collected: Location based on the IP address
- Technologies Used: Cookies
- Cookie URL: –
- Location of Processing: European Union
- Retention Period
- Cookie: 30 minutes
- IP address in the log files for 10 days – the location and weather data is transmitted to the customer system, no further storage takes place on our site.
- Policy of Procesor : Data privacy https://www.meteonomiqs.com/data-privacy/
- Data Protection Officer: datenschutz@wetter.com
- Storage information: Cookie (Maximum age of cookie storage: 30 minutes) is set through Weathertag but it is shown as a first Party. No Non-cookie storage
If you are using a CMP prior to TCF2.0 or some other consent solution, please include the above information in your privacy statement as needed.
Step 4: Configure Weather Tag in Google Tag Manager
Go to “Variables” and create data layer variables for both Google Analytics and wetter.com from your CMP. Name them as “CMP.GoogleAnalytics” and “CMP.WeatherTag”, respectively. Create a new custom tag. Select the template “meteonomiqs – weather tag”.
Name your tag ‘Weathertag – Request Weatherdata’ and fill out the following fields:
-
API_KEY: Add the API key you have received during registration.
-
Cookie Name Meteonomiqs: _sessmetonmq (this is prefilled)
Add a trigger with the name “Weathertag Trigger – Consent” to this tag, that it fires as soon as consent for the Weather Tag is given. “CMP.WeatherTag” should be used as a condition in the trigger. Save the tag.
Note: In contrast to previous version, this tag is not a cleanup tag.
Remark: If a meteonomiqs cookie is already in place (because in the browser of the user the weather data was requested within the last 30 minutes), the tag will fire but do not send a request.
Step 5: Create Variables
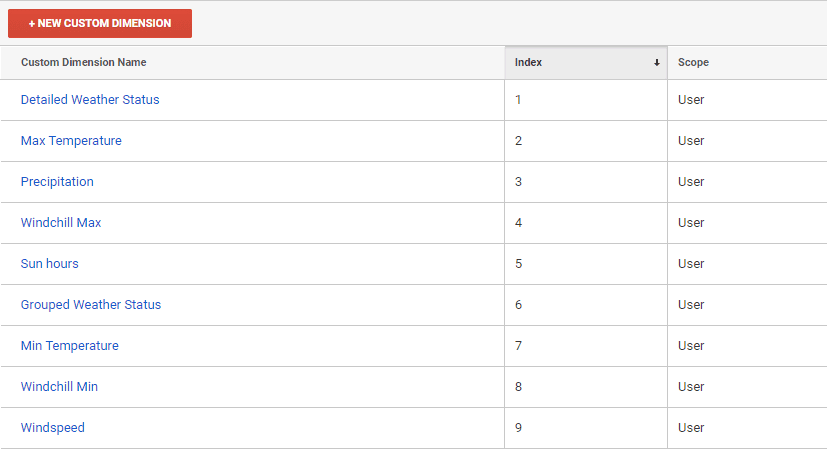
First create custom dimensions on your Google analytics property with “User” scope with the weather parameter names: Detailed Weather Status, Grouped Weather Status, Temperature Maximum, Temperature Minimum, Precipitation, Windchill, Sun hours, Windspeed Maximum.
Remark: Beginning in Version 3 of the Weather Tag, we are not sending the events directly to Google Analytics. After firing the tag, the Weather Tag will push the weather information to the dataLayer:
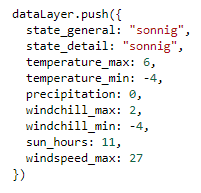
After pushing the information, an event will be added to the dataLayer named “weatherinformation”:
![]()
Second, in your Google Tag Manager account create dataLayer variables that will contain the weather information as shown below:
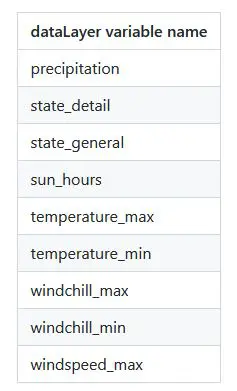
Third, set the names of the variable in Google Tag Manager equal to the dataLayer variable names, but with the prefix DLV., e.g. DLV.temperature_min.
Step 6: Send data to Google Analytics
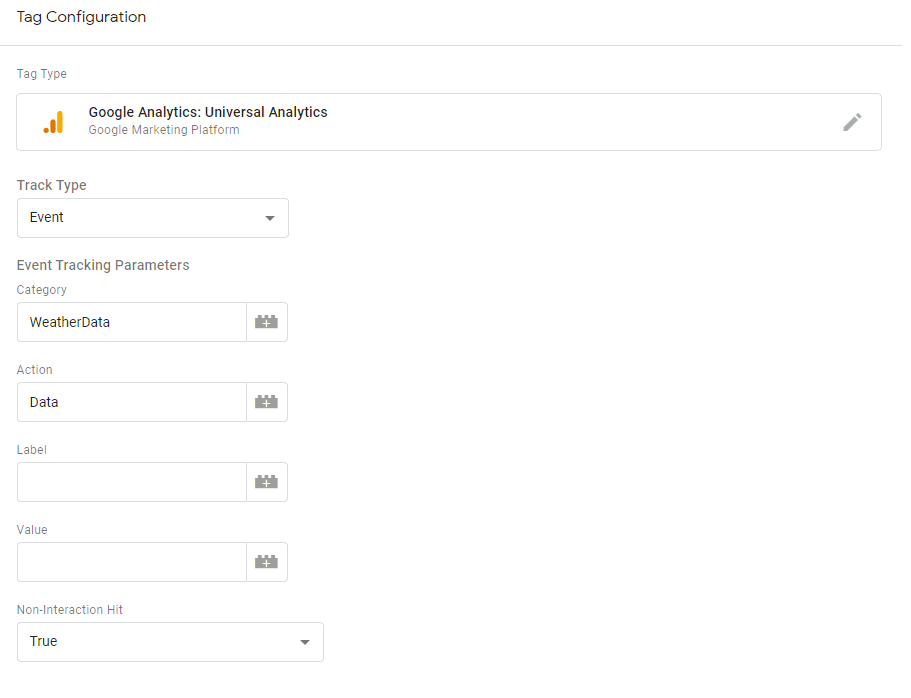
Create a event tag “Weathertag – Fill Datalayer” for Google Analytics and add “Event Category”, “Event Action” (optional) and “Event Label” (optional). Ensure that “Non-Interaction Hit” is “True” to avoid creating users without sessions.
In the section “Custom Dimensions”, please map the custom dimension indexes to the dataLayer variables:
If you don’t see the option for adding Custom Dimensions in the Google Analytics Event Tag, please click on “Enable overriding settings in this tag”, go to “More Settings” and the section “Custom Dimensions” will appear.
Add a trigger “Weathertag Trigger – Fill Datalayer” to fire the tag after the weather information is pushed to the dataLayer and Google Analytics consent is given.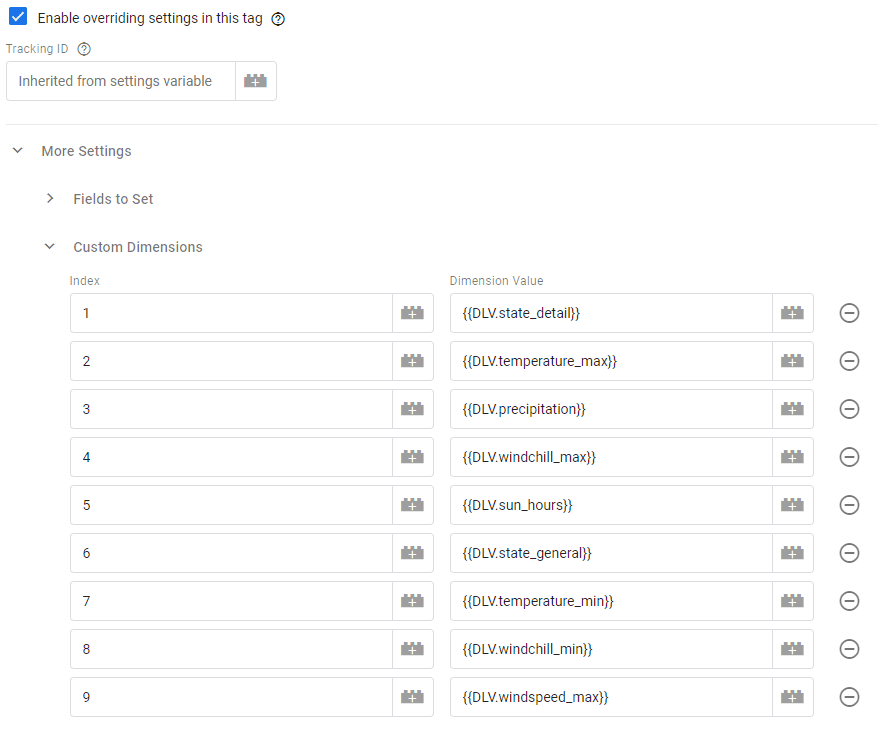
Add a trigger “Weathertag Trigger – Fill Datalayer” to fire the tag after the weather information is pushed to the dataLayer and Google Analytics consent is given.

In case you do not have a CMP, just select ‘PageView’ instead of ‘Custom Event’ as Trigger Type in ‘Weathertag Trigger – Fill Datalayer’.
YEAH, YOU MADE IT !!! Now you can start analyzing and optimizing :)
Any questions? Then write to us via info@meteonomiqs.com. We will be happy to help you.

The Weather Tag in use
Once the Weather Tag is configured, user session data is linked to weather data. This means you can now analyze how different weather conditions affect user behavior.
3 possible use cases:
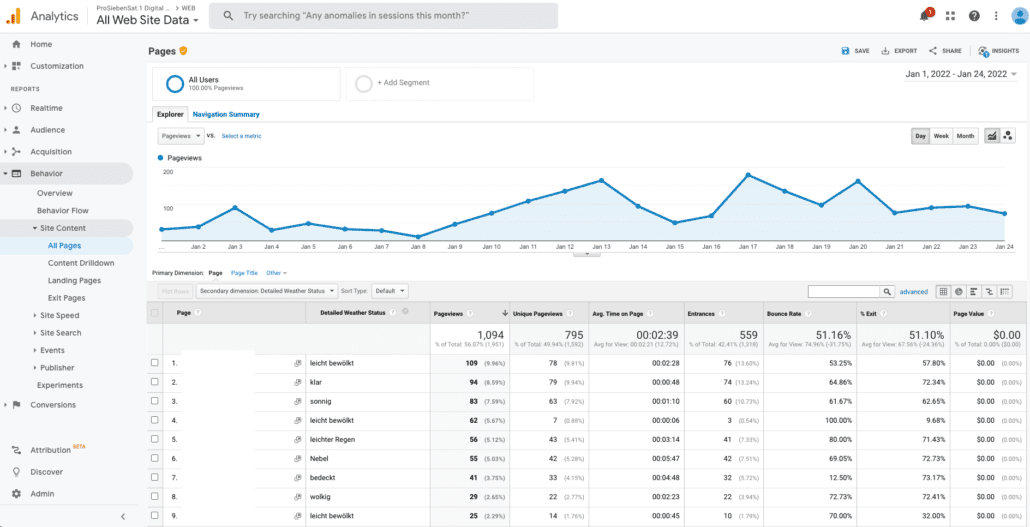
1. You can take a closer look at the “behavior flow” of your customers depending on the weather: Behavior -> Site Content -> All Pages.
Select the appropriate page and add the weather parameters as a secondary dimension. This will provide you with insights into how page visits vary with different weather conditions.
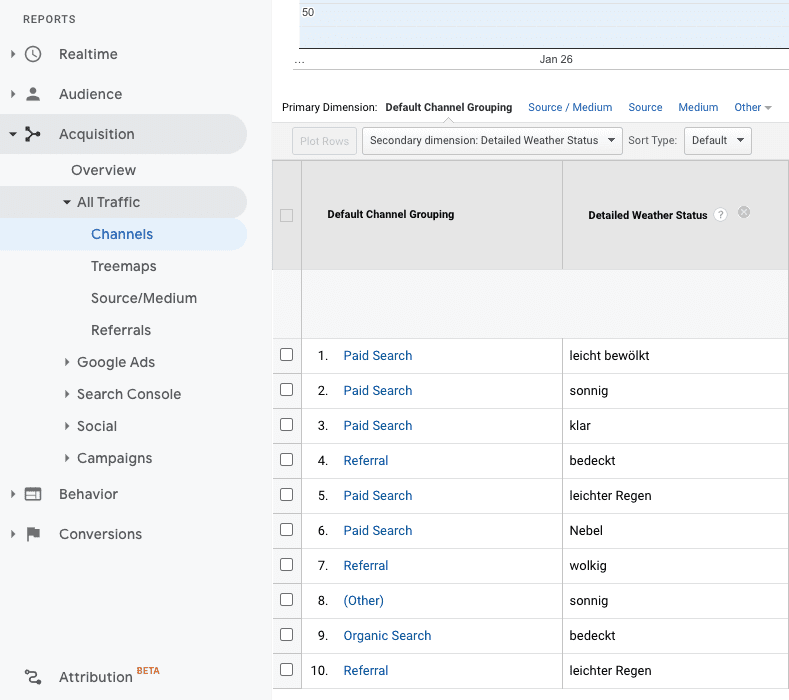
2. Analyze from which traffic sources your customers come: Acquisition -> All Traffic -> Channels
Add weather parameters as a secondary dimension. This will give you insight into how your campaign performs in different weather conditions.
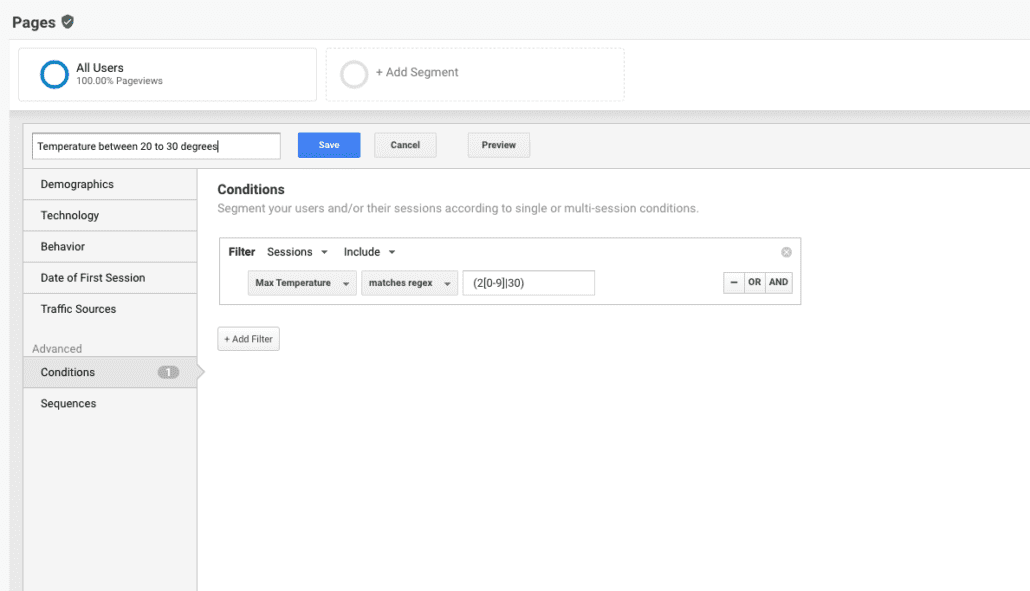
3. Form segments via the RegEx function (regular expressions):
For example, you can narrow down a specific temperature range that they are particularly interested in. This will bundle exactly those visits that took place during this temperature range.